To add a failover domain, follow these steps:
-
At the left frame of the the Cluster Configuration Tool, click Failover Domains.
-
At the bottom of the right frame (labeled Properties), click the Create a Failover Domain button. Clicking the Create a Failover Domain button causes the Add Failover Domain dialog box to be displayed.
-
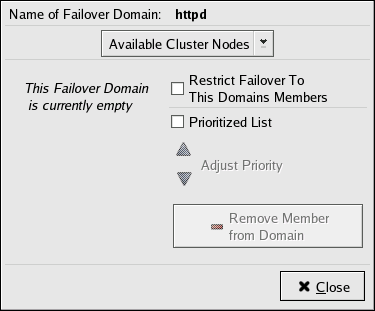
At the Add Failover Domain dialog box, specify a failover domain name at the Name for new Failover Domain text box and click OK. Clicking OK causes the Failover Domain Configuration dialog box to be displayed (Figure 4.7, “Failover Domain Configuration: Configuring a Failover Domain”).
Note
The name should be descriptive enough to distinguish its purpose relative to other names used in your cluster.
-
Click the Available Cluster Nodes drop-down box and select the members for this failover domain.
-
To restrict failover to members in this failover domain, click (check) the Restrict Failover To This Domains Members checkbox. (With Restrict Failover To This Domains Members checked, services assigned to this failover domain fail over only to nodes in this failover domain.)
-
To prioritize the order in which the members in the failover domain assume control of a failed cluster service, follow these steps:
-
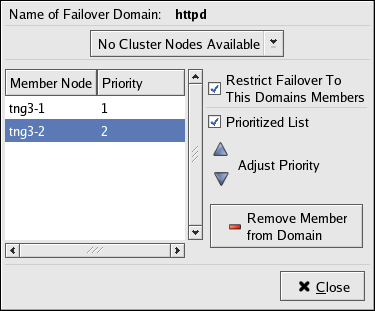
Click (check) the Prioritized List checkbox (Figure 4.8, “Failover Domain Configuration: Adjusting Priority”). Clicking Prioritized List causes the Priority column to be displayed next to the Member Node column.
-
For each node that requires a priority adjustment, click the node listed in the Member Node/Priority columns and adjust priority by clicking one of the Adjust Priority arrows. Priority is indicated by the position in the Member Node column and the value in the Priority column. The node priorities are listed highest to lowest, with the highest priority node at the top of the Member Node column (having the lowest Priority number).
-
-
Click Close to create the domain.
-
At the Cluster Configuration Tool, perform one of the following actions depending on whether the configuration is for a new cluster or for one that is operational and running:
-
New cluster — If this is a new cluster, choose File => Save to save the changes to the cluster configuration.
-
Running cluster — If this cluster is operational and running, and you want to propagate the change immediately, click the Send to Cluster button. Clicking Send to Cluster automatically saves the configuration change. If you do not want to propagate the change immediately, choose File => Save to save the changes to the cluster configuration.
-

